
The Sea Doo baffle (fuel pickup) has an integrated fuel sensor on models which have a fuel gauge. It consists of a foam float with magnets attached which moves up/down along a circuit board with changing fuel level. The stock Sea Doo float was prone to deterioration with time. Once the float deteriorates to the point of losing buoyancy or if magnets become detached, no fuel reading will be possible. If you have found this to be the case, then you need to install a new design fuel float.
The procedure is relatively easy and only takes about an hour to complete. You’ll want to do this procedure when your fuel tank is low to reduce the chance of spillage.
Parts needed:
Procedure:
Disconnect BLACK negative cable, then RED positive cable of battery.
WARNING : Always disconnect battery cables exactly in the specified order, BLACK negative cable first. Electrolyte or fuel vapors can be present in the engine compartment and a spark might ignite them and possibly cause personal injuries.
Empty fuel tank.
WARNING : Fuel is flammable and explosive under certain conditions. Always work in a well ventilated area. Do not smoke or allow open flames or sparks in the vicinity. Always wipe off any fuel spillage from the watercraft.
All Models Except HX
HX Model Only
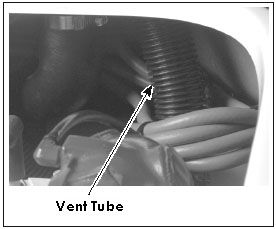
Pull down left vent tube.
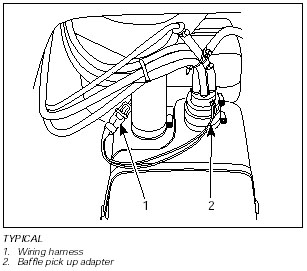
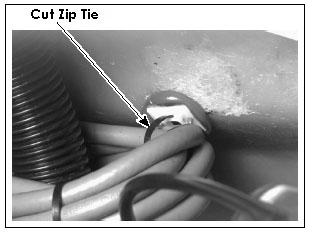
Cut zip tie retaining fuel hoses to tie-mount.
Loosen lower clamp of baffle pick up adapter and pull out baffle from fuel tank.
All Models
Push inward on the three clips at the base of the baffle in order to remove the filter. Pry base off using a small screwdriver (if necessary).
Remove old fuel float from baffle.
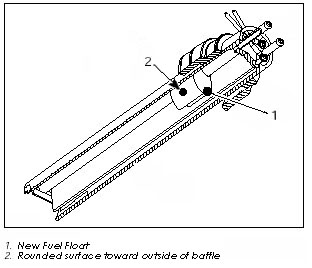
Install new plastic fuel float.
Ensure the rounded surface of the float is installed toward the outside of the baffle.
Baffle installation is essentially the reverse of disassembly procedures.
Pay particular attention to the following:
Install baffle pick up into fuel tank and push it until it sits on fuel tank neck. Install clamp and torque both clamps to 3 N•m (27 lbf•in).
HX Model Only
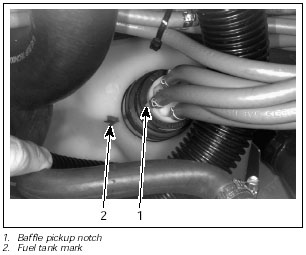
Make sure to align notch of baffle pick up with the mark on the fuel tank.
If possible, perform the Fuel System Pressurization Test described below.
WARNING : Whenever doing any type of repair on watercraft or if any components of the fuel system are disconnected, a pressure test must be done before starting engine. Make sure to check fuel line ends for damage. Always cut/repair any damaged end before Pressure Test.
Proceed as follows:
– Fill up fuel tank.
– Disconnect air inlet hose of fuel tank from body.
– Install a hose pincher (P / N 295-000-076) on fuel tank vent hose.
– Connect pump gauge tester (P / N 295-000-085) to air inlet hose.
– Turn fuel valve to OFF position and pressurize fuel system to 34 kPa (5 PSI). If no leaks are found, turn fuel valve to ON position and pressurize once more.
– If pressure is not maintained locate leak and repair/replace component leaking. To ease leak search spray a solution of soapy water on components, bubbles will indicate leak location.
NOTE : The system must maintain a pressure of 34 kPa (5 PSI) during 10 minutes. Never pressurize over 34 kPa (5 PSI).
Reconnect air inlet hose of fuel tank to body.
WARNING : If any leak is found, do not start the engine and wipe off any fuel leakage. Do not use electric powered tools on watercraft unless system has passed pressure test.
NOTE : Before removing the hose pincher, block with your finger the outlet hole to feel if air is coming out when removing hose pincher. This will indicate that pressure relief valve and the outlet fitting are not blocked.
Remove hose pincher from fuel tank vent hose.