Proper Tuning of Your Mikuni Carburetor
Proper carburetor setup and adjustment is essential for peak performance and longer engine life. The only good way to adjust the carbs is to take the craft to the water, but before you do that though, you need to know the basics of a Mikuni carb and what makes them tick. There is basically an order to follow to accurately adjust and calibrate a Mikuni and thatĺs listed below along with the effect it has.
- LOW SPEED ADJUSTER - To adjust smooth idle
- POP-OFF PRESSURE - Just off idle to 1/4 throttle in conjunction with the low speed jet.
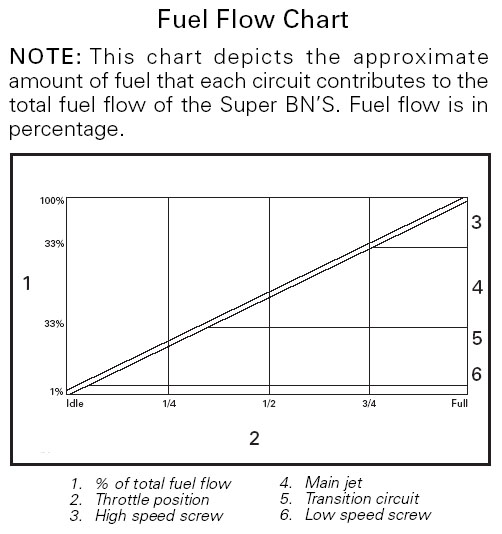
- LOW SPEED JET - Just off idle to 1/3 throttle.
- HIGH SPEED JET - 1/3 to 3/4 throttle.
- HIGH SPEED SDJUSTER - 3/4 to wide open throttle.
The reason for adjusting in that order is because several fuel circuits contribute to the total fuel delivery of the carburetor. For exampleů changing the low speed jet affects wide open fuel delivery. The exceptions to the rule are the low speed adjuster and the regulator portion. The low speed adjuster has no tuning effect past 1/3 throttle and the regulator portion has no tuning effect past 1/4 throttle although it continues to control fuel supply.
Next, I'll go over the carb adjustment order from start to finish.
First, the idle speed and engine smoothness needs to be adjusted properly. The Idle Stop Screw is used to adjust the idle of the craft to the proper recommended idle (see oem specs). As a rule of thumb, the idle should be adjusted to around 1100 rpm (in water).
The Low Speed Adjuster is used in conjunction with the idle stop adjuster to maintain proper idle speed and smoothness. Once proper idle rpm has been set previously, turn the low speed adjuster in and out in small increments until a smooth idle is obtained. Note that changes in the idle stop screw will change the low speed mixture so that will have to be corrected by further adjustment of the low speed adjuster.
Finally, understand that the low speed adjuster is only to be used to adjust idle mixture. Itĺs not for adjusting low speed hesitation and will only lead to further problems if you use it for that. In-water low speed adjustment procedures are listed below.
Tools needed:
- Flat screwdriver
- Plug wrench
Parts needed:
- 1 Pr. NEW Spark Plugs (properly gapped)
Procedure:
- Locate your low and high speed screws (the low speed is lower on the carb and the high speed is higher). The low speed screw is easy to find and may have a t-handle for ease in turning. The high speed screw may have a plastic cap on it. You will have to remove the cap in order to adjust the carbs (it just pulls off). Once you have located these screws and are familiar with where they are, gather your tools and head to the lake. I also recommend heading for a calm area with little boat traffic as you will be making adjustments on the water.
- With the ski in the water and with the old plugs in the engine, start the ski and adjust the idle speed screw until the engine idles smoothly but doesn't want to take off. You should be able to stand and hold the ski stationary while idling. If you have a tachometer, it should read 1500 RPM in the water. NOTE: out-of-water idle will be significantly higher, some as high as 3000 RPM. If you don't have a tach but have a speedo, your craft should idle at 2-3 MPH in the water.
- Once the ski is up to running temperature (maybe 5 minutes), remove the old plugs and install a set of new plugs that are gapped correctly.
- Take the craft for a low speed ride, no more than 1/4 throttle, for 5 minutes or so then when in a clear area, pull the lanyard and let the ski come to a stop.
- Remove the plugs and inspect them. You are looking for a chocolate brown color on the rim of the plug (the end of the metal threaded part that is exposed to combustion). If the color is tan or nonexistent, the fuel air mixture is too lean. If the color is black the mixture is too rich. Turn the low speed mixture screw(s) in (clockwise) to lean the mixture and out (counterclockwise) to richen the mixture. Do this in 1/8 turn increments and repeat step 4 and 5 until the proper mixture is achieved.
- SEE BELOW FOR THE PROPER HIGH SPEED ADJUSTMENT PROCEDURES
Second, Pop Off Pressure works in conjunction with the Low Speed Jet so changing the jet can correct a pop off problem. For example, if your pop off is set slightly too high, you can compensate by increasing the size of the low speed jet. The opposite also applies. If your low speed jet is too small, you can lower your pop off pressure to get the desired throttle response. There are two things that will tell you the low speed jet and pop off are set properly. First, throttle response should be crisp with no hesitation. Second, if you're riding at 1/4 throttle for a minute or so then quickly open the throttle, there should be no hesitation and the engine shouldn't show signs of being loaded up. If it hesitates, it's lean. If it loads up, it's rich. You'll need to adjust the pop off or low speed jet to compensate for either condition. You can check out how to adjust pop off and test other portions of the Mikuni here.
Finally, it's worth mentioning that Sea Doo watercraft come from the factory with relatively high pop off pressures since the oem intake is restrictive. If you do mods to the intake system (aftermarket flame arrestors, manifold, etc.), you would need to lower the pop off to compensate.

Third, the High Speed Jet starts contributing to the engines fuel supply at about 3/8 throttle, overlapping the low speed jet. The high speed jet is the primary tuning component from 1/2 to 3/4 throttle.
As you have probably noted, tuning has been discussed relating to different throttle positions. The reason is that carb jetting doesn't relate to engine rpms or the boats speed, it only relates to how far the throttle has been opened. Each circuit of the carb responds that way. This is why when trying to diagnose a carb or fuel system problem, you need to identify at which throttle opening position the problem occurs in order to troubleshoot/adjust the proper circuit.
The procedure for setting the correct high speed jet size is basically the same as for the low speed except that you now hold the throttle 1/2 open for a minute or so then open fully to check engine response. If it hesitates, it's lean. If it loads up and takes a couple seconds to clear out then accelerate, it's rich. You'll need to adjust the high speed jet to compensate for either condition.
Fourth, the High Speed Adjuster is the last to adjust. It primarily controls fuel delivery from 3/4 to wide open throttle. Turning the adjuster clockwise reduces fuel flow (lean) and counterclockwise increases fuel flow (richen). Maximum fuel flow is 3 turns out from closed.
The procedure for testing the high speed adjuster setting is outlined below.
Tools needed:
- Flat screwdriver
- Plug wrench
Parts needed:
- 1 Pr. NEW Spark Plugs (properly gapped)
Procedure:
- First, follow the procedures above for adjusting the idle speed and low speed mixture.
- The same procedure you did for low speed mixture applies for high speed except you run the craft at 3/4 throttle or greater for at least a couple minutes then pull the lanyard or kill the engine with the stop button without letting off the throttle.
- Remove the plugs and inspect them. You are looking for a chocolate brown color on the rim of the plug (the end of the metal threaded part that is exposed to combustion). If the color is tan or nonexistent, the fuel air mixture is too lean. If the color is black the mixture is too rich. Turn the screws in (clockwise) to lean the mixture and out (counterclockwise) to richen the mixture. Do this in 1/8 turn increments and repeat step 2 and 3 until the proper mixture is achieved. When adjusting the high speed screw(s) be very careful and always aim towards rich rather than lean to prevent premature engine damage.
If you follow the procedures above you should be able to get your ski in good running condition. There is always factors though that will cause you headaches in tuning. If the engine isn't in great mechanical condition, tuning will be a trick. Also, adding aftermarket components also requires you to go through the whole adjustment procedures to get the unit to run right. Mixing and matching aftermarket components can also cause you tuning headaches.
Finally, most of the info above was compiled from Mikuni so should be accurate. If you find there is a mistake or need more info, let me know and I'll try and help!
Visitors - since 3/17/2007